Saturday, May 28, 2011

How To Take a Picture of Your Screen/ Screenshot (and Save it to Your Computer))

How to:  Take a Picture of Your Screen/ Screenshot and Save it using Microsoft Paint
In order to take a picture of your screen you will need to have the item you want to take a picture of, on your screen.  Then press the 'Print Screen' button usually on the top right side of your keyboard.
Click to enlarge picture

Then you will want to open up 'Paint' sometimes known as 'MS Paint'.  Which is located from the Start Menu > All Programs > Accessories > Paint.  Open up 'Paint' and then press CRTL + V or right click and select 'Paste' and that will put the image onto 'Paint'.
Click to enlarge picture

Then choose the 'Select' and that will allow you to box the small part of the image you want to save.
Click to enlarge picture

  Once you use the select to box the item you want, right click it and select 'Cut'.  Then open up a new 'Paint' window.  In the new window, press CRTL +V or right click and select 'Paste'.  Then 'Save As' the image and then you will be able to view it anytime later or upload it to a website.

What can you take Screenshots of?
- Webpages (assuming there is no copyright)
- Videogames
- Problem with your computer so you can send it to a friend to inspect

What can you do with Screenshots?
- Send them to friends and family
- Show off scores to your friends
- Upload them to a website


           Hope This Helps!
            -TerrabyteCafe

Sunday, May 22, 2011

How to Delete Browsing History and Cookies on Internet Explorer, Firefox, and Google Chrome

To Get These Browsers: (All Free)
Internet Explorer
Firefox
Google Chrome


Benefits of Clearing Browsing Data/ History
-Safety
-Increases internet speed (usually)
-Clears up space


Internet Explorer:
When in Internet Explorer click on 'Safety' located in the top right of the browser.  Then select 'Delete Browsing History...'.  This will open up another window in which you will be able to select the items to be deleted.  If using a public computer I recommend checking in all the boxes.  If at a home computer I recommend checking 'Preserve Favorites website data', 'Temporary Internet files', 'Cookies', and 'History'.  Then press 'Delete' to delete the selected items.
Click on the image to enlarge it


Firefox:
When in Firefox click on the orange button in the top left corner of the screen called 'Firefox'.  Then select 'History', and then select 'Clear Recent History...'  This will open up a new window called 'Clear All History'. Select the time range to clear to 'Everything', then select all boxes for a public computer.  For a home computer select 'Browsing & Download History', 'Form & Search History', 'Cookies', and 'Cache'.  Then press 'Clear Now' to delete the selected items.

Click on the image to enlarge it

Google Chrome:
When in Google Chrome, click on the 'Wrench' icon in the top right of the window, and select 'Options' which will open up a new window.  Then select the tab 'Under the Hood' on the left side of the new window, and then select 'Clear browsing data', this will open up a new window.  For a public computer have everything selected.  For a home computer select 'Obliterate the following from: the beginning of time', 'Clear browsing history', 'Clear download history', 'Empty the cache' and 'Delete Cookies and other site data'.  The press 'Clear browsing data' to delete the selected items.
Click image to enlarge


            Hope this helps!
           -TerrabyteCafe

Tuesday, May 17, 2011

How to Install Windows 7/ Vista From a USB Flash Drive

Things you'll need to install Windows 7/ Vista onto a USB flash drive
-4GB USB Flash Drive
-WinRAR (freeware)
-Windows 7/ Vista Installer DVD
-(Also if you would rather install Windows XP to your USB flash drive here is a tutorial on How to Install Windows XP to a USB flash drive.)

PLEASE NOTE:  If you are currently using 32-bit Windows Vista or 7 then you will be able to install 32-bit version of Windows Vista or 7 onto your USB.  This will not work if you try to install a 64-bit version of windows from a 32-bit machine.  64-bit version of windows will install correctly if you install it on a machine that is running 64-bit version of windows.

Step 1: Formatting The USB Flash Drive -Here is a Guide on Formating your USB flash drive-
To install Windows 7/ Vista to the USB flash drive, you must format the USB flash drive which deletes everything that is stored.  I recommend backing up existing data.

Step 2: Open up Command Prompt (CMD) as the Adminstrator.
You can open this by finding cmd.exe in the Windows/System32 folder, Or right clicking the program in the start menu and selecting 'Run as Administrator'.
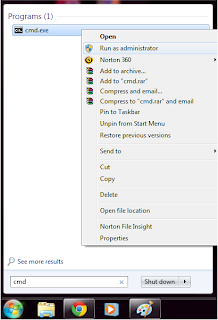
Run as Administrator

Step 3:  Command Prompt should open under C:\\Windows\System32 (assuming Windows is installed on the C drive).  Now type "diskpart" and press 'Enter' to proceed to the Disk Partition Command Line Tool, which allows you to format and create partitions on active disks.
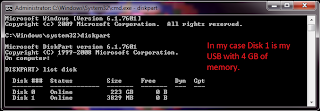
Click on the image to enlarge it.
   Type 'list disk' to reveal a list of all the storage devices that are active on your machine, each will have a number next to them stating the storage capacity.  Make a note of which of the Disk's that shows up is your USB flash drive (you should be able to tell based on the size of the USB and the size listed next to the disks).  In the screenshot below my USB flash drive is Disk 1 (4 GB).

Step 4: Now enter these commands, ONE at a time:

Select Disk # (Where # is the Disk number of your USB flash drive, I typed in 'Select Disk 1')

Clean (This removes any existing partitions from the USB disk which includes hidden sectors!)

Create Partition Primary (Creates a new primary partition with default settings)

Select Partition 1 (Enter in "1" not your disk number, this will focus all new commands at the newly created partition)

Active (This sets the new partition to active, thus letting the disk firmware that this is a valid partiton)

Format FS=NTFS (Formats the partition using NTFS file system and this will take several minutes to complete based on the size of your USB flash drive.)

Assign (This gives the USB drive a the next available drive letter, which you should make note of.  For example I was given "G".)

Exit (Exits out of the Disk Partition Command Line Tool)
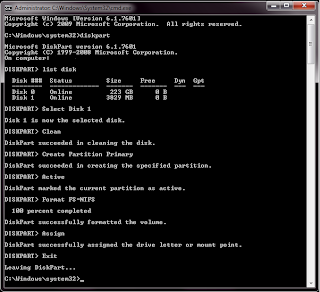
Click on the image to enlarge it.
Step 5: Insert the Windows 7 Install DVD into your machine.
View the files that the Windows 7 installer DVD contains and 'Copy' and 'Paste' all the files into a folder on your desktop.  I created a folder and named the folder 'Windows 7'.  You can create a folder by right clicking the desktop, selecting 'New' and then selecting 'Folder'.  The transfer of the disc contents may take a couple of minutes.
   Go back to the command prompt, running as an Administrator.  Now we are going to enter the path to where you copy and pasted your files on your desktop.  Your command line that you want will probably look like 'C:\Users\USERNAMEHERE\Desktop\Windows 7\'

Step 6: Now enter these commands, ONE at a time (Remember must be run as Administrator):

cd C:\  (Redirects the command prompt to interact with C:\ drive, which is where my windows 7 folder is saved on, I am assuming that your Windows Partition is saved on the C drive)


cd Users  (Redirects the command prompt to interact with C:\Users)


cd USERNAME (My username is Jessie, so I entered 'cd Jessie', you should enter what your username is, if you're not sure what your username is, you can click on the start menu and it should be located near the picture)


cd Desktop  (Redirects the command prompt to interact with C:\Users\Jessie\Desktop)


cd Windows 7  (Redirects the command prompt to interact with C:\Users\Jessie\Desktop\Windows 7 which is the folder that you saved the contents of the Windows 7 installer disc to)


cd boot (Redirects the command prompt to interact with the folder named: boot)


Bootsect.exe /nt60 G: (IMPORTANT: this is where "G" is the drive letter assigned to your USB flash drive from the previous step.  Bootsect adds boot manager code into your USB flash drive allowing it to become a bootable device).
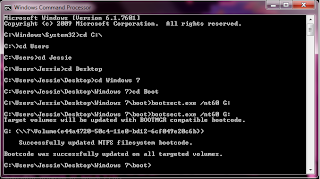
Click on the image to enlarge it.
PLEASE NOTE:  If you are currently using 32-bit Windows Vista or 7, Bootsect will only work if you are trying to install 32-bit Windows Vista or 7 onto your USB flash drive.  Bootsect will not run 64-bit version of windows if installed from a 32-bit machine.  64-bit version of windows will install correctly if you install it on a machine that is running 64-bit version of windows.
Click on the image to enlarge it.


Step 7: Load the USB flash drive with the Windows 7 folder
Copy the folder that you created earlier named 'Windows 7' to the USB flash drive.  This is not done with the command prompt, I recommend to 'copy' the folder and 'paste' it onto the USB flash drive.  Please remember to load it to the correct USB.  (You can also just drag and drop the files from the 'Windows 7' folder into the drive using Windows Explorer).
Your USB flash drive is now complete BUT in order to use it, make sure you enter the BIO (typically with F2 or F12 right when the computer is starting up) to temporarily change the boot order so that your computer boots first from the 'USB Storage Device' (often called in the BIOs menu).  On restart, you system should then load up the setup files off the USB flash drive and enter Windows 7 installation.
Please Note:  Remember to change back the BIOs boot order so that Internal HDD is the first when you are finished.  Remember that to use your new USB flash drive on a different computer you must change the boot order for the computer so that 'USB Storage Device' is first.

            Hope this helps!
           -TerrabyteCafe

How to Format a USB Flash Drive

This guide works for Windows XP, Windows Vista, and Windows 7.
To format your USB flash drive / flash memory card
1st Plug in the USB
2nd open up 'My Computer' which can be found in the start menu
3rd Right click the removable disk drive that you want to format
Note -Formatting a USB flash drive deletes ALL existing data, so it suggested to back up any data you want to keep.

4. Click "format" on the menu

5. A new window should appear named 'Format Removable Disk" should appear

6. Make sure 'Quick Format' is NOT selected, make sure the 'File System' is set to 'FAT32', the 'Allocation unit size' should be set to 'Default allocation size'  Then Press 'Start'

7. A new window will appear informing you that this will erase all data on this disk, be sure that you have any data you want to keep backed up already.  Then press 'OK' to continue.

8.  The process may take some time depending on how large the USB is, once complete you will have successfully formated a usb flash drive / flash memory card.


        Hope This Helps!
       -TerrabyteCafe

Monday, May 16, 2011

How to Run Windows XP From a USB flash drive (Bart PE Builder)

         The advantages of having a backup version of Windows that can run off a USB flash drive is that if your computer gets a virus infection, or the system crashes or becomes corrupt, or the hard drive fails, you'll always have a back up so you can keep working or playing.  Also with additional software put onto the flash drive you can always have your favorite browser, virus scanner, office software, games, ebooks, and DVD burner with you.
        All you need to get started is a USB flash drive (at least 256MB) and a copy of the Windows XP Operating Software or Windows Server 2003 (Setup CD).  The larger and newer the USB flash drive the faster the operating system will run.  Also the larger the USB flash drive the more software and information you can bring with you.  Using the program Bart PE Builder (Freeware), you will be able to install Windows XP on your USB flash drive (as well as other software depending on USB size).  Once finished installing you will then be able to run windows XP off your USB flash drive.  (This may require changing the BIOs setting so that your USB flash drive is the first to boot to depending on the computer.)

       Bart Lagerweij's free software, called 'PE Builder', compresses the data for Windows XP into a small operating system that can run off a CD or USB flash drive.  This is also helpful for dealing with PC emergencies or Recovery Kits. 

Some other helpful software to add to your portable computer!
-Antivirus- A list of antivirus programs that run off a USB flash drive
-eBooks-  A list of great sites to get free eBooks to load onto your USB flash drive.
-Office Software- Useful for when you know exactly how to use the software you have at home or work, because now you can take it anywhere with you.
-Games- Sometimes you just need a break and they'll always be on hand now.
-Browser- Bring your favorite browser with you everywhere using Bart PE Builder.

If you're looking to install Windows 7 or Windows Vista onto a USB flash drive, check out this tutorial.

    Hope this helps!
  -TerrabyteCafe

Saturday, May 14, 2011

How to Remove Tunnel Adapters/ Get Past Them (Information/ipconfig)

 A Little History
        Tunnel adapters are a way for IPv6 networks (semi new) to send data through IPv4 (1970s) networks.  Back in the 1970s when IPv4 networks were implemented, there were 4,294,967,296 (2^32) created.  The addresses soon started to run short as the year 2000 approached, so IPv6 was implemented due to the exhaustion of IPv4 addresses.  There are 340,282,366,920,938,463,463,374,607,431,768,211,456 (3.4x10^38) IPv6 addresses, thus it is unlikely that they will ever be exhausted.  
      
 The Purpose of Tunnel Adapters
       Tunnel adapters were implemented because it allowed IPv6 packets with a IPv4 header to be sent across a IPv4 network.  The other ways of using a IPv6 network with IPv4 networks often were more difficult to implement or less efficient to use.  Thus allowing "Automatic Tunneling Pseudo-Interface" to be widely spread and used.


Removing Tunnel Adapters/ Getting Past Them (ipconfig)
       There is no real need to delete them as that may cause system damage so instead the way to get past tunnel adapters to find ip information is to type into command prompt "ipconfig /all |more" and then press 'enter' several times on the keyboard until you come across the information you are looking for.  
Press 'Enter' several times for all the information to be revealed.
The symbol "|" can be found right above the 'enter' key on the keyboard and is under the 'backspace' button.


Right above the 'Enter' key and just below the 'Backspace' key.


The Benefits of IPv6
-Its large address space, stops any further exhaustion of ip addresses. 
-It has better security because it requires Internet Protocol Security (also known as IPSec), in IPv4 it is only optional.  
-It is has much better mobility for networking.  If a machine changes location on a IPv6 network, it will still maintain all the existing connections -- this is often not the case on IPv4 networks.  The new fields in the IPv6 header for the packets being downloaded change how their traffic is handled.  If a packet belongs to a series of packets, it will be handled more efficiently.


             Hope this helps!
            -TerrabyteCafe

Saturday, May 7, 2011

How to Combine Videos Together (Using VirtualDub)

   Combining Videos Together      
          You will need VirtualDub (free video editing software) to combine videos together.  I have used it in the past to combine videos together from Fraps to upload videos to Youtube.  When opening VirtualDub, drag the video you want to combine onto that window, OR go to 'File' which can be found at the top left of the window and select 'open video file...' it and browse your computer to find it.
         Then at the bottom of the VirtualDub window the scroller must be dragged all the way to the end (far right), at which point the video screen will appear gray
         Then drag the next video onto the gray screen (and the new video will appear right at the end of the first video) OR go to 'File' at the top left of the window and select 'Append AVI segment' which will allow you to browse your computer for another video which will then appear at the end of the first video.  Then 'Save As' this video and they will be combined.  This can be done several times to make a very large video.  This is especially helpful if you reached the limit of a video file size and had to take several videos of the same thing.   If you want to add a smaller or different video to the middle of a larger video the simply move the scroller to where you want the other video to start then go to 'Append AVI segment' and select the video you want to have start there.
   Compressing Videos for Upload or Storage 
        If you're looking to upload this video or wish to reduce the size of it, you may want to compress the video:  make it the file size smaller while still retaining high quality.  In which case I have another tutorial to reduce the size right here.