Saturday, May 28, 2011

How To Take a Picture of Your Screen/ Screenshot (and Save it to Your Computer))

How to:  Take a Picture of Your Screen/ Screenshot and Save it using Microsoft Paint
In order to take a picture of your screen you will need to have the item you want to take a picture of, on your screen.  Then press the 'Print Screen' button usually on the top right side of your keyboard.
Click to enlarge picture

Then you will want to open up 'Paint' sometimes known as 'MS Paint'.  Which is located from the Start Menu > All Programs > Accessories > Paint.  Open up 'Paint' and then press CRTL + V or right click and select 'Paste' and that will put the image onto 'Paint'.
Click to enlarge picture

Then choose the 'Select' and that will allow you to box the small part of the image you want to save.
Click to enlarge picture

  Once you use the select to box the item you want, right click it and select 'Cut'.  Then open up a new 'Paint' window.  In the new window, press CRTL +V or right click and select 'Paste'.  Then 'Save As' the image and then you will be able to view it anytime later or upload it to a website.

What can you take Screenshots of?
- Webpages (assuming there is no copyright)
- Videogames
- Problem with your computer so you can send it to a friend to inspect

What can you do with Screenshots?
- Send them to friends and family
- Show off scores to your friends
- Upload them to a website


           Hope This Helps!
            -TerrabyteCafe

Sunday, May 22, 2011

How to Delete Browsing History and Cookies on Internet Explorer, Firefox, and Google Chrome

To Get These Browsers: (All Free)
Internet Explorer
Firefox
Google Chrome


Benefits of Clearing Browsing Data/ History
-Safety
-Increases internet speed (usually)
-Clears up space


Internet Explorer:
When in Internet Explorer click on 'Safety' located in the top right of the browser.  Then select 'Delete Browsing History...'.  This will open up another window in which you will be able to select the items to be deleted.  If using a public computer I recommend checking in all the boxes.  If at a home computer I recommend checking 'Preserve Favorites website data', 'Temporary Internet files', 'Cookies', and 'History'.  Then press 'Delete' to delete the selected items.
Click on the image to enlarge it


Firefox:
When in Firefox click on the orange button in the top left corner of the screen called 'Firefox'.  Then select 'History', and then select 'Clear Recent History...'  This will open up a new window called 'Clear All History'. Select the time range to clear to 'Everything', then select all boxes for a public computer.  For a home computer select 'Browsing & Download History', 'Form & Search History', 'Cookies', and 'Cache'.  Then press 'Clear Now' to delete the selected items.

Click on the image to enlarge it

Google Chrome:
When in Google Chrome, click on the 'Wrench' icon in the top right of the window, and select 'Options' which will open up a new window.  Then select the tab 'Under the Hood' on the left side of the new window, and then select 'Clear browsing data', this will open up a new window.  For a public computer have everything selected.  For a home computer select 'Obliterate the following from: the beginning of time', 'Clear browsing history', 'Clear download history', 'Empty the cache' and 'Delete Cookies and other site data'.  The press 'Clear browsing data' to delete the selected items.
Click image to enlarge


            Hope this helps!
           -TerrabyteCafe

Tuesday, May 17, 2011

How to Install Windows 7/ Vista From a USB Flash Drive

Things you'll need to install Windows 7/ Vista onto a USB flash drive
-4GB USB Flash Drive
-WinRAR (freeware)
-Windows 7/ Vista Installer DVD
-(Also if you would rather install Windows XP to your USB flash drive here is a tutorial on How to Install Windows XP to a USB flash drive.)

PLEASE NOTE:  If you are currently using 32-bit Windows Vista or 7 then you will be able to install 32-bit version of Windows Vista or 7 onto your USB.  This will not work if you try to install a 64-bit version of windows from a 32-bit machine.  64-bit version of windows will install correctly if you install it on a machine that is running 64-bit version of windows.

Step 1: Formatting The USB Flash Drive -Here is a Guide on Formating your USB flash drive-
To install Windows 7/ Vista to the USB flash drive, you must format the USB flash drive which deletes everything that is stored.  I recommend backing up existing data.

Step 2: Open up Command Prompt (CMD) as the Adminstrator.
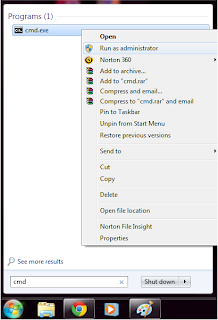
You can open this by finding cmd.exe in the Windows/System32 folder, Or right clicking the program in the start menu and selecting 'Run as Administrator'.
Run as Administrator

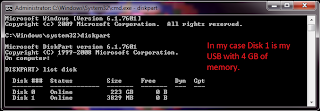
Step 3:  Command Prompt should open under C:\\Windows\System32 (assuming Windows is installed on the C drive).  Now type "diskpart" and press 'Enter' to proceed to the Disk Partition Command Line Tool, which allows you to format and create partitions on active disks.
Click on the image to enlarge it.
   Type 'list disk' to reveal a list of all the storage devices that are active on your machine, each will have a number next to them stating the storage capacity.  Make a note of which of the Disk's that shows up is your USB flash drive (you should be able to tell based on the size of the USB and the size listed next to the disks).  In the screenshot below my USB flash drive is Disk 1 (4 GB).

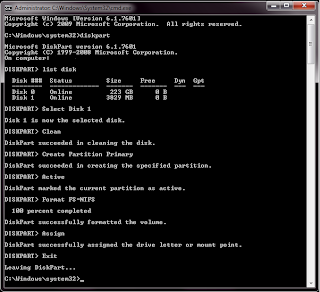
Step 4: Now enter these commands, ONE at a time:

Select Disk # (Where # is the Disk number of your USB flash drive, I typed in 'Select Disk 1')

Clean (This removes any existing partitions from the USB disk which includes hidden sectors!)

Create Partition Primary (Creates a new primary partition with default settings)

Select Partition 1 (Enter in "1" not your disk number, this will focus all new commands at the newly created partition)

Active (This sets the new partition to active, thus letting the disk firmware that this is a valid partiton)

Format FS=NTFS (Formats the partition using NTFS file system and this will take several minutes to complete based on the size of your USB flash drive.)

Assign (This gives the USB drive a the next available drive letter, which you should make note of.  For example I was given "G".)

Exit (Exits out of the Disk Partition Command Line Tool)
Click on the image to enlarge it.
Step 5: Insert the Windows 7 Install DVD into your machine.
View the files that the Windows 7 installer DVD contains and 'Copy' and 'Paste' all the files into a folder on your desktop.  I created a folder and named the folder 'Windows 7'.  You can create a folder by right clicking the desktop, selecting 'New' and then selecting 'Folder'.  The transfer of the disc contents may take a couple of minutes.
   Go back to the command prompt, running as an Administrator.  Now we are going to enter the path to where you copy and pasted your files on your desktop.  Your command line that you want will probably look like 'C:\Users\USERNAMEHERE\Desktop\Windows 7\'

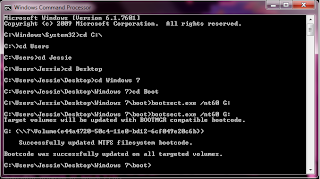
Step 6: Now enter these commands, ONE at a time (Remember must be run as Administrator):

cd C:\  (Redirects the command prompt to interact with C:\ drive, which is where my windows 7 folder is saved on, I am assuming that your Windows Partition is saved on the C drive)


cd Users  (Redirects the command prompt to interact with C:\Users)


cd USERNAME (My username is Jessie, so I entered 'cd Jessie', you should enter what your username is, if you're not sure what your username is, you can click on the start menu and it should be located near the picture)


cd Desktop  (Redirects the command prompt to interact with C:\Users\Jessie\Desktop)


cd Windows 7  (Redirects the command prompt to interact with C:\Users\Jessie\Desktop\Windows 7 which is the folder that you saved the contents of the Windows 7 installer disc to)


cd boot (Redirects the command prompt to interact with the folder named: boot)


Bootsect.exe /nt60 G: (IMPORTANT: this is where "G" is the drive letter assigned to your USB flash drive from the previous step.  Bootsect adds boot manager code into your USB flash drive allowing it to become a bootable device).
Click on the image to enlarge it.
PLEASE NOTE:  If you are currently using 32-bit Windows Vista or 7, Bootsect will only work if you are trying to install 32-bit Windows Vista or 7 onto your USB flash drive.  Bootsect will not run 64-bit version of windows if installed from a 32-bit machine.  64-bit version of windows will install correctly if you install it on a machine that is running 64-bit version of windows.
Click on the image to enlarge it.


Step 7: Load the USB flash drive with the Windows 7 folder
Copy the folder that you created earlier named 'Windows 7' to the USB flash drive.  This is not done with the command prompt, I recommend to 'copy' the folder and 'paste' it onto the USB flash drive.  Please remember to load it to the correct USB.  (You can also just drag and drop the files from the 'Windows 7' folder into the drive using Windows Explorer).
Your USB flash drive is now complete BUT in order to use it, make sure you enter the BIO (typically with F2 or F12 right when the computer is starting up) to temporarily change the boot order so that your computer boots first from the 'USB Storage Device' (often called in the BIOs menu).  On restart, you system should then load up the setup files off the USB flash drive and enter Windows 7 installation.
Please Note:  Remember to change back the BIOs boot order so that Internal HDD is the first when you are finished.  Remember that to use your new USB flash drive on a different computer you must change the boot order for the computer so that 'USB Storage Device' is first.

            Hope this helps!
           -TerrabyteCafe

How to Format a USB Flash Drive

This guide works for Windows XP, Windows Vista, and Windows 7.
To format your USB flash drive / flash memory card
1st Plug in the USB
2nd open up 'My Computer' which can be found in the start menu
3rd Right click the removable disk drive that you want to format
Note -Formatting a USB flash drive deletes ALL existing data, so it suggested to back up any data you want to keep.

4. Click "format" on the menu

5. A new window should appear named 'Format Removable Disk" should appear

6. Make sure 'Quick Format' is NOT selected, make sure the 'File System' is set to 'FAT32', the 'Allocation unit size' should be set to 'Default allocation size'  Then Press 'Start'

7. A new window will appear informing you that this will erase all data on this disk, be sure that you have any data you want to keep backed up already.  Then press 'OK' to continue.

8.  The process may take some time depending on how large the USB is, once complete you will have successfully formated a usb flash drive / flash memory card.


        Hope This Helps!
       -TerrabyteCafe

Monday, May 16, 2011

How to Run Windows XP From a USB flash drive (Bart PE Builder)

         The advantages of having a backup version of Windows that can run off a USB flash drive is that if your computer gets a virus infection, or the system crashes or becomes corrupt, or the hard drive fails, you'll always have a back up so you can keep working or playing.  Also with additional software put onto the flash drive you can always have your favorite browser, virus scanner, office software, games, ebooks, and DVD burner with you.
        All you need to get started is a USB flash drive (at least 256MB) and a copy of the Windows XP Operating Software or Windows Server 2003 (Setup CD).  The larger and newer the USB flash drive the faster the operating system will run.  Also the larger the USB flash drive the more software and information you can bring with you.  Using the program Bart PE Builder (Freeware), you will be able to install Windows XP on your USB flash drive (as well as other software depending on USB size).  Once finished installing you will then be able to run windows XP off your USB flash drive.  (This may require changing the BIOs setting so that your USB flash drive is the first to boot to depending on the computer.)

       Bart Lagerweij's free software, called 'PE Builder', compresses the data for Windows XP into a small operating system that can run off a CD or USB flash drive.  This is also helpful for dealing with PC emergencies or Recovery Kits. 

Some other helpful software to add to your portable computer!
-Antivirus- A list of antivirus programs that run off a USB flash drive
-eBooks-  A list of great sites to get free eBooks to load onto your USB flash drive.
-Office Software- Useful for when you know exactly how to use the software you have at home or work, because now you can take it anywhere with you.
-Games- Sometimes you just need a break and they'll always be on hand now.
-Browser- Bring your favorite browser with you everywhere using Bart PE Builder.

If you're looking to install Windows 7 or Windows Vista onto a USB flash drive, check out this tutorial.

    Hope this helps!
  -TerrabyteCafe

Saturday, May 14, 2011

How to Remove Tunnel Adapters/ Get Past Them (Information/ipconfig)

 A Little History
        Tunnel adapters are a way for IPv6 networks (semi new) to send data through IPv4 (1970s) networks.  Back in the 1970s when IPv4 networks were implemented, there were 4,294,967,296 (2^32) created.  The addresses soon started to run short as the year 2000 approached, so IPv6 was implemented due to the exhaustion of IPv4 addresses.  There are 340,282,366,920,938,463,463,374,607,431,768,211,456 (3.4x10^38) IPv6 addresses, thus it is unlikely that they will ever be exhausted.  
      
 The Purpose of Tunnel Adapters
       Tunnel adapters were implemented because it allowed IPv6 packets with a IPv4 header to be sent across a IPv4 network.  The other ways of using a IPv6 network with IPv4 networks often were more difficult to implement or less efficient to use.  Thus allowing "Automatic Tunneling Pseudo-Interface" to be widely spread and used.


Removing Tunnel Adapters/ Getting Past Them (ipconfig)
       There is no real need to delete them as that may cause system damage so instead the way to get past tunnel adapters to find ip information is to type into command prompt "ipconfig /all |more" and then press 'enter' several times on the keyboard until you come across the information you are looking for.  
Press 'Enter' several times for all the information to be revealed.
The symbol "|" can be found right above the 'enter' key on the keyboard and is under the 'backspace' button.


Right above the 'Enter' key and just below the 'Backspace' key.


The Benefits of IPv6
-Its large address space, stops any further exhaustion of ip addresses. 
-It has better security because it requires Internet Protocol Security (also known as IPSec), in IPv4 it is only optional.  
-It is has much better mobility for networking.  If a machine changes location on a IPv6 network, it will still maintain all the existing connections -- this is often not the case on IPv4 networks.  The new fields in the IPv6 header for the packets being downloaded change how their traffic is handled.  If a packet belongs to a series of packets, it will be handled more efficiently.


             Hope this helps!
            -TerrabyteCafe

Saturday, May 7, 2011

How to Combine Videos Together (Using VirtualDub)

   Combining Videos Together      
          You will need VirtualDub (free video editing software) to combine videos together.  I have used it in the past to combine videos together from Fraps to upload videos to Youtube.  When opening VirtualDub, drag the video you want to combine onto that window, OR go to 'File' which can be found at the top left of the window and select 'open video file...' it and browse your computer to find it.
         Then at the bottom of the VirtualDub window the scroller must be dragged all the way to the end (far right), at which point the video screen will appear gray
         Then drag the next video onto the gray screen (and the new video will appear right at the end of the first video) OR go to 'File' at the top left of the window and select 'Append AVI segment' which will allow you to browse your computer for another video which will then appear at the end of the first video.  Then 'Save As' this video and they will be combined.  This can be done several times to make a very large video.  This is especially helpful if you reached the limit of a video file size and had to take several videos of the same thing.   If you want to add a smaller or different video to the middle of a larger video the simply move the scroller to where you want the other video to start then go to 'Append AVI segment' and select the video you want to have start there.
   Compressing Videos for Upload or Storage 
        If you're looking to upload this video or wish to reduce the size of it, you may want to compress the video:  make it the file size smaller while still retaining high quality.  In which case I have another tutorial to reduce the size right here.

Tuesday, May 3, 2011

How to Compress Video Files Without Losing Quality (With Fraps 1080p)

             To compress a video using Fraps, be sure to have VirtualDub (Free) and Xvid (Free).  Open up VirtualDub and drag the video into it's window and then go to Audio at the top and click on -Full Processing Mode-.  Then under the video tab at the top click on -Compression-.  Make sure that -Xvid MPEG-4 Codec- is selected and then click on -Configure- to the right of it.  For -Profile @ Level-, it will default at -Xvid Home-  if you recorded at another quality besides 360p, 480p or lower, then select 720p or 1080p.
              When -Target bitrate (kbps):- is selected I recommend 12000 on 1080p for games, otherwise 9500 for other video.  For 720p I recommend 6000 for games and 3500 for other video.  For -Xvid Home- (360p, 480p and lower) I recommend 3000 for games, and 1500 for other video.  The higher the number the higher the quality.  When -Target quantizer:- is selected I recommend -1 (maximum value)- because it yields the highest quality.
             Then click okay to save the configuration, and then click okay again to leave the -select video compression- window.  Then go to -file- in the top left corner, and click on -Save as AVI- name the file and the program will begin to compress the file which can take a bit of time to complete depending on the computer.
             When using these programs to compress a video, I was able to reduce the file size from 4315.67MB (1080p) to 534.15MB which reduced the original file size to 12% and it still was great quality.

                Hope this helps!
              -TerrabyteCafe

Monday, May 2, 2011

How to Prevent/Deny a Program Access to the Internet

There are many programs on your computer that may be connecting to the internet without you knowing, which can become a security hazard.  To stop or limit the programs on a Windows Vista and Windows 7 Operating System, type in "Window's firewall with advanced security" and click on it.
In the new window, in the top left it says 'Inbound Rules' and 'Outbound Rules'  click on 'Inbound Rules' first then select the program from the list and on the top right it says 'New Rule' click on that, then click next, then click 'Browse' and find the program you want to block.  
          Then select 'Block this connection'.  Then hit next again, name this rule and give it a description if you want.  Do the exact same with outbound rules and you're set!  If you have any questions or comments please leave them in the comment section below.

                 Stay Safe!
              -Terrabytecafe

Friday, April 22, 2011

How to Create a Strong Password so You Don't Get Hacked

It is extremely important to pick a good, secure password, because your password is the only way the computer can verify that the person logging on is actually you.  The top reasons that people gain unauthorized access to password protected machines is they guessed the persons password, usually because they found it on a sticky note or piece of paper next to the victim's computer or because they witnessed the person type in the password. There are also software programs that are extremely good at guessing passwords as I discussed in my previous article that can even find complex passwords like MHYNMMA5ETBC.


Dangers of Weak Passwords
If someone obtains your password, they could potentially go to your account and look through your private data: email, bank accounts (credit cards, social security number), phone messages.  Then they could proceed to either alter or destroy your files and take over your computer, and they may even perform illegal activities under your name. In these cases it is extremely difficult to find out who the culprit is and you may even face charges for their crimes.

Guidelines
Make your password long and over 15 characters as the longer it is, the more difficult it will be to attack the password with brute force.  A brute force attack is continually attempting to log in starting alphabetically, such as aaa.. aab.. aac... aad... aae... etc.. usually up to 15 characters in length. Some sites are less secure than others, and will allow this kind of attack to hit the server 100 times a second, at which point the criminal will leave his computer running as his software attacks the server for hours to days until he gains access.

How to make an easy to remember password over 15 characters
Make your password have spaces, such as 'the tomato is blue'.  Also try using capital letters 'I love eating fruit'.  Both of these passwords are extremely secure from brute force attacks and would likely last hundreds of years against a brute force that attacks a server at 100 times a second.  I know hundred years sounds rather long and will most likely outlive you, but not only will criminals give up, you will rest better at night knowing you are safe.

Mistakes of short simple lowercase letter passwords
When a website asks "security questions" incase you forget your password, and often the questions are:
What is your spouse's name? parent's name? pet's name? child's name? elementary/middle/high school name? your birthdate and your phone number, your address.  A criminal who finds out some information about you and feels that you are a worthy target will purchase reports on you from several websites and services that have a surprising amount of information on you and will use the information like 'parent's name' or 'your address' to gain access to your account because your security password was weak.  You can make your security answer/passwords stronger by having 'my mom's name is Emily' where you combine spaces, capital letters and symbols.  This is slightly more difficult to remember than 'the tomato is blue' but it is very effective at stopping criminals in their tracks.

     Stay Safe!
   -TerrabyteCafe

How to Create, Write and Publish Your Own eBook for Free

 eBooks are becoming an increasingly popular alternative to the traditional paperback or hardcover book.  They're a unique form of web content because they are highly portable and can be shared virtually (and if printed they can be viewed the traditional way).
          Having your own eBook has several advantages, for example attracting traffic to your website, building a brand name, and many others.


What can you do with an eBook? 

Publicize your brand: Encourage people to download your eBook and include features that promote yourself, your site, and your products. You'll also benefit from this free advertising.
Go Viral: If your ideas are interesting or creative enough you could go viral (reaching a large online audience through word-of mouth publicity) and it would be an extremely big promotion of both yourself and your product.
Strike it Rich:  Sell your book on different sites and get royalty.  You could sell as a whole, sell chapters, sell monthly updates, or sell never released chapters, offer the reprint rights to your eBook, etc..
Store the Archives:  You could offer your all of your blog's or website's archives in an eBook, as this will be an easy way to get new visitors up to speed on what you do.
And More: Take a moment to think about what you are trying to accomplish with your book and what is the best method to achieve it.

The Many Forms of a eBook

Digital Book:  The traditional form of an eBook is often around a hundred pages and is similar to a book that would be purchased at a bookstore.  This kind of eBook is most likely to go viral or be widely circulated because it has a lot of information and value.  As with traditional books, the digital book will often be broken down into chapters on particular topics and contains more than one idea or focus.  This will have the potential for the greatest gains, but it will be the most time consuming option of the many available.
Manifesto:  This will be less time consuming but will still be able to go viral because of it's focus is on getting across one idea in 1 to 25 pages.  Do you have a great idea?  Or a super good tip?  It may be a great idea for a manifesto.  
Bonus or Archived Content:  For the webmaster or blogger, you could a create extra or bonus content eBook.  This is mostly just for packaging the new content in an eBook rather than publishing it on your site. this could be used as an incentive for someone to subscribe or encourage readers to distribute it around the internet, increasing the possibility of new traffic to your site (as most likely your eBook will contain a link to your domain).
Alternative forms of an eBook?:  Don't forget that Essays, Short stories Poetry/Poems, and Children books all fall into the category of a eBook and may be easier to write than a traditional book, depending on your writing style.

How to make an eBook! 
Now comes the fun part. The best and most efficient format for a eBook is PDF as they give the feel and look a traditional book but on the screen.  PDF files can be created with Adobe Acrobat if you own the program, but if you don't it can be very costly... so let's look at some alternatives!  If you have Microsoft Word, save the file as a .doc format, and if you are using a different Word processor, then save the file as .rtf.  Both of these files can be converted later into PDFs with the use of some free online programs.

Footer
Your eBook should contain page numbers, a link your website, and your logo/name preferably on every page.

Beautiful
For eBooks there are no printing costs, so make sure to use colorful fonts and headings, pictures, and other colorful items to make it visually interesting.  There are no printing costs, but it does increase the download size of the eBook.  Also, if you use a neat picture you found online, be careful of copyright laws.

Tradition
Look at some of the good paperback copies of books and then read some of the popular eBooks to see what looks good.  Take notes on the best visuals, the best formats, and try to recreate that in your own eBook.  Remember to use introductions, chapters, sub-headings, etc.

Forge it
The idea of writing a best-selling is book is a well liked thought amongst most of us, even if it's just wishful thinking.  It's recommended to write your eBook with a lot of care as you would a potential best-seller, as readers will notice and appreciate the care that is put into the eBook they are reading.

Composition - Baby Steps

If you're unsure how to translate your vision onto paper, it's definitely worth the time to get to know your Word Processor and other skills required to write a eBook.  Here is a link to an audio course from Microsoft on how to use their Word processor.

Editing - The Most Important Step
Unlike your web-page, you cannot edit what you post, because once people download and share copies, you cannot take back their old copies and hand them new ones. You can send out an email or post an update for corrections that are made, but it is essential to get it right the first time around.  
Draft
Make a Draft, then a re-draft, check grammar and spelling multiple times, then put the eBook down for a few days and then come back to edit it with a fresh mind. Don't rush yourself. Print it out on paper because sometimes you'll catch things you wouldn't otherwise see on the screen.
Grab Some Friends
Have your family and friends take a look at it as they will probably find some errors you may have missed, and can  also give you feedback on what is unclear or difficult to read.  If your eBook isn't for the average person, but a specialized audience, you could share it with some trusted friends and other readers are within the target audience that you want.
Copyright
Ideas are not copyrighted, and therefore the ideas you see, hear, or read anywhere can be used in your eBook.  You can use the same ideas that are on the best seller list on Amazon.  BUT Copyright law does protect the way ideas are expressed. So, be careful you don't plagiarize or copy book text outright.  You can create an eBook that covers the same subject with a different perspective or voice.  Looking at the bestseller list is a good way to get ideas for your eBook.  I do urge all of you to make sure you check copyright laws if you are uncertain.


Conversion
Upon completion of your final draft, it is now time to find a way to convert to your finished product.  There are many free online converters and free software programs that can convert your word processor file into a PDF.  It is worth trying a couple to see which one works best with your document.

Adobe has a converter that you can use, but you have to buy it. It's relatively cheap and will most likely produce the best results and be found here.  But since that costs money and this a free guide, we hate it. A high quality free program is PrimoPDF, and will allow you to convert to PDF from 32-bit Vista, XP, NT, ME, 98 machines. If you have a 64-bit machine or Windows 7, they have a 14-day free trial for you to use.

If neither of those programs are to your satisfaction, you'll be able to find many other programs just by Googling "document to PDF converters".  It's important to test the program first to see how the different converters make your eBook look.

The Goal with PDF Converters
-Formatting:  Make sure that your PDF looks as much like your word processing document; check to be sure that fonts, colors, images, columns and spacing are displayed the same.
-Clarity:  Ensure that the PDF converters don't blur your text.
-Download Size:  The smaller the PDF, the easier it is for people to email them, and spread through other viral methods.  The ideal size is less than one megabyte, but anything less than five megabytes is good.  It is important that it is less than five megabytes because some people will not be able to attach it to their email if it is larger than five megabytes.

Distributing Your eBook
Once you have converted your eBook to PDF and it's looking ready, you will want to start finding ways to distribute it to the masses.  The first step is to upload it to your website/webhost, if you don't have one then there a several free file-hosting services that are available. 

-Scribd:  A free PDF and document hosting website, kind of like Youtube, but for PDFs.
-Rapidshare:  A free file hosting website.

Rewards
If you only want your eBook to be available to a certain group of people as a reward for doing something such as subscribing to your website/feed, reviewing your site, or commenting,  You can make the eBook available for download on a webpage that is not connected to your main website layout. This gives you control over who has access to your eBook. Additionally, you can  add a password to the download page which you can send in a email to your newly found subscriber. Decide on a complicated password (something that is unlikely to produce many search results) such as a random combination of letters (Capital and lowercase), numbers and symbols. An example: Tu9jD>HDu09=dY94.  This specificity will allow you to search for this password and if anyone is posting your password on a website you can immediately find out who it is and then change your password on your website.

Going Viral
This kind of distribution requires your audience to actively share and promote your eBook.  some helpful tips for going viral are:
-Ask them:  Ask and encourage your readers to share your eBook
-The file name:  Add 'ReadandShare' to your eBook's file name, an example is 'ebooknameReadandShare.pdf'.
-Email list:  Make a email list of your eBook owners/readers and offer them a link to join a webpage for this list only, and this will create a feeling of being exclusive and will let you leverage your existing audience, if you ever release another eBook in the future.
-Context:  Emphasize that your eBook is free and is available to for download at static pages
-Ideas:  Give and suggest ways that your eBook can be shared, and encourage your readers to host it on their site, email it to their friends and link your download page.

Ending
It is possible to follow all of these steps and end up with a high quality eBook that costs you nothing to make!  Please feel free to share questions, ideas, or concerns into the comment section below.

         Hope this helps!
        -TerrabyteCafe

Sunday, April 17, 2011

Loading up Your USB With Free eBooks

         Loading Up Your USB With Free eBooks
Load up your USB with free eBooks to pass the time when you go to places with a laptop or if there are public computers nearby. Some great places to get free eBooks are:Project GutenbergBarnes and Noble, and free-ebooks.


                  What are the benefits of using eBooks?
1. eBooks are good for the environment. They save trees, removing the need to put old books into landfills. There is also no cost of transportation and pollution associated with shipping books across the country and world.
2. eBooks are faster to produce than traditional paper books, allowing the reader to find out about current issues and events.
3. eBooks can be updated easily for correcting errors and adding new information.
4. eBooks are searchable, allowing the reader to look up a favorite quote.
5. eBooks are free!

If you can't find a book that you wanted from those sites, you can always go to Amazon and purchase them. A good example is the Unofficial Harry Potter Cookbook: From Muggles To Magic--an interesting book that you probably couldn't find elsewhere.

                      Happy reading!
                      -TerrabyteCafe


Using a USB to Remove Spyware and Viruses From Your PC

       A very handy tool is using the USB as a cleaning kit with programs and applications for saving infected computers. This is useful when the computer is disconnected from the internet and cannot download the software required to clean the computer. It's also a good kit when you're helping a friend rescue their virus infected PC. 
    
A good revival kit will be packed with a range of applications and programs from the following categories:

        Spyware Scanner:  The more spyware scanners, the better.  No single utility finds everything.  Some good ones are Ad-Aware (free), Spybot Search & Destroy (free), and PestPatrol (free trial).  None of these will run directly from the USB, so put the installer files on USB for a quick installation on the infected PC.
      
         Antivirus Tool:  A good antivirus tool that runs directly off the USB is Avira AntiVir (free edition).  After removing the infection to make sure your PC remains protected use: AVG (free edition), Avira AntiVir (free edition), these have free trials: Norton and Titanium have 30 day free trials.
      
         Disk Wiper:  When worse comes to worst, and the infected PC cannot be saved, a secure disk shredder is helpful to have.  A number of disk wiping programs run from the USB including: Kill Disk (free), and Eraser.
         When using the security programs be sure to keep them updated, otherwise they may not be much help when fighting against viruses and spyware.


                Hope this helps
               -TerrabyteCafe

Friday, April 15, 2011

Setting Up a USB to Back Up Your Computer Files

       Most likely you use a USB to backup important documents and files, but why not make the entire process easier?  There are several programs that allow you to sync files on your computer with your USB drive.  Two of the programs are Allway Sync and Windows Backup Center (comes in Windows).

For Windows Backup Center
Windows 7
Control Panel > System and Security > Back up your computer
Vista
Control Panel > System Maintenance > Backup and Restore Center

Then select the USB as the place to backup the files
Why?
This way you won't have to manually copy & paste files. Instead, just insert the USB and you're done.

         Hope this helps
    -TerrabyteCafe

Increase the Speed of Your Computer and Lifespan of Your Battery Life With a USB Using Readyboost

         Readyboost was first introduced in Windows Vista, and is able to speed up the computer and increase the battery life of the computer using a USB Flash or some other storable media. The USB Flash holds onto files in addition to your RAM.

Requirements:
-SD Cards and a USB Flash with a minimum space of 2 GB (Recommended 4 GB or more)
-If using an SSD, you will need to enable Superfetch by typing Sysmain in the Windows 7 searchbar in the "start menu" and then clicking on Sysmain and scrolling down to Superfetch and right clicking and selecting start.
-Not all flashdrives work
-Total cost: $0
      
         First go to "My Computer" and right click on the USB Flash/SD Card and click Properties. Then select 'Readyboost' tab and select on Dedicate this device to ReadyBoost (for maximum results) or select Use this device and use the scrollbar to decide how much space to dedicate to the Readyboost. Once done, you may notice that your computer is slightly faster (and that your battery life has extended if you're using a laptop).

          Hope this helps!
         -TerrabyteCafe


How to Lock Up Your Computer With a USB Drive

USB is a secure way to block Ophcracker from accessing your hard drive or password.  This will allow you to use a USB to BOOT to Windows.  If someone tries to start the computer without the USB(s) that you create, the screen will display boot errors. Warning: This may disable you from being able to boot into your Windows partition, please continue at your own risk.
You need:
-At least a 64MB or larger sized USB Stick
-Windows Recovery Disk (just in case)

--There are two ways to do this: with a program or manually
1. Use the program Predator which also allows you to remotely monitor all access-control activity on your PC

2. Or do this manually and show off your tech skills
        First make sure to "unhide" hidden and protected files, go to Tools > Options > View, check show hidden files and un-check Hide protected system files.
1.  From the hard drive where Windows is installed (usually the C:\ drive), copy the files boot.ini, ntdlr and ntdetect,com to the USB stick.
2.  Then go into BIOS, and enable the USB Drive as the first boot device (you may have to enable USB Legacy Support on older BIOSes).
3.  Restart the computer. If everything is correct, Windows will start up normally.  If not, unplug the USB Stick, return to the BIOS and change the First Boot device to the hard drive and repeat the first two steps above.
4.  Once logged into Windows, go to the hard drive where Windows is installed on and rename boot.ini to boot.bak.
5.  Now to test if everything was done correctly, eject the USB stick and reboot the computer, there should be a error message displayed on the screen, such as "Windows could not start" or "Invalid Boot.ini".

         Hope this helps
        -TerrabyteCafe

Thursday, April 14, 2011

How to Crack the Login Password on Windows

          Computers have locks just like your home's front door and their purpose is to keep people out.  A login password will not keep many people out--it is easy to gain access to unencrypted data. On computers running Windows OS there is a free program called Ophcrack. The program is based on Slackware and uses rainbow tables to solve passwords that are up to 14 characters in length.  It takes approximately 10 seconds to find the password and there is little to no skill needed to perform this.

  The How To
            Download Ophcrack and burn it onto a blank CD or load it onto a USB via UNetbootin.  Then insert the CD into the computer and turn off the computer (by holding the power button until it shuts down). Turn it back on and enter the BIOS at the startup, change the boot sequence so that CD (or USB) comes before HDD, then save and exit.  Restart the computer and Ophcrack will start to be loaded. Let it run, write the down the passwords it gives, remove the disc, restart the computer and enter the password given by Ophcrack.

   Difficult Passwords to Hack
            If you're worried about someone hacking your computer with a program like this or someone else hacking you over the internet, check out my article on creating a safe and secure password that is easy to remember.

Note:  Should probably return the BIOS sequence back to normal to reduce any errors in the future if a user leaves a CD in the tray.

          Hope this helps!
         -TerrabyteCafe

Privacy Policy

Privacy Policy for terrabytecafe.blogspot.com
Third party vendors, including Google use cookies to serve ads on terrabytecafe.blogspot.com based on user's visits to this site and others.  Google uses DART cookies, which allow it's partners to serve ads based on visits to terrabytecafe.blogspot.com and/or other sites on the internet.  Users may opt out of DART cookie by visiting this page.  Another third party vendor that serves ads on  terrabytecafe.blogspot.com is Amazon and they also use a similar cookie, for more information on Amazon's privacy policy please visit this page.  For information on Google's privacy policy page please visit this page.  Please note if these page links are broken please contact me at terrabytecafe@gmail.com so that I may update them.